
软件包
lora gateway 在基础文件系统之上,需要添加以下 yocto 包
- ec20: 4G 通信
- lora-gateway: sx1301 官方 hal 库
- packet-forwarder: semtech 官方 lora 报文转发软件,直接控制 lora 芯片,作为 lora 芯片与上层应用间的桥梁
- chirpstack-gateway-bridge: 用于连接 packet-forwarder 与云服务器上的 chirpstack-network-server 服务
我们通过 ppp 拨号使用 4g 数据业务
新建 ec20 包如下

创建完成后进入详情,选择 auto enable systemd, systemd 文件名称填写 ec20.service, 这个是我们即将创建的 systemd service 文件名
需要添加 ppp_provider, ppp_pap, systemd service 三个文件
- 4g_provider
# example configuration for a dialup connection authenticated with PAP or CHAP
#
# This is the default configuration used by pon(1) and poff(1).
# See the manual page pppd(8) for information on all the options.

# MUST CHANGE: replace myusername@realm with the PPP login name given to
# your by your provider.
# There should be a matching entry with the password in /etc/ppp/pap-secrets
# and/or /etc/ppp/chap-secrets.
# user "ctnet@mycdma.cn"
# password "vnet.mobi"

# MUST CHANGE: replace ******** with the phone number of your provider.
# The /etc/chatscripts/pap chat script may be modified to change the
# modem initialization string.
connect "/usr/sbin/chat -s -v -f /etc/chatscripts/4g_pap"

# Serial device to which the modem is connected.
/dev/ttyUSB2

# Speed of the serial line.
115200

# Assumes that your IP address is allocated dynamically by the ISP.
noipdefault
# Try to get the name server addresses from the ISP.
# usepeerdns
# Use this connection as the default route.
defaultroute

# Makes pppd "dial again" when the connection is lost.
persist

# Do not ask the remote to authenticate.
# noauth

debug

nocrtscts

nodetach

ipcp-accept-local

ipcp-accept-remote

dump

ifname "ppp-4g"

# lock
- 4g_pap
ABORT		BUSY
ABORT		VOICE
ABORT		"NO CARRIER"
ABORT		"NO DIALTONE"
ABORT		"NO DIAL TONE"
""      AT\d
"OK"	AT+CGDCONT=1,"IP","3gnet",,0,0\d
""		ATD*98*1#\d
CONNECT		""
- ec20.service
[Unit]
Description=EC20 PPP

[Service]
WorkingDirectory=/usr/sbin
ExecStart=/usr/sbin/pppd call 4g_provider
SyslogIdentifier=ec20
Restart=always
RestartSec=5

[Install]
WantedBy=multi-user.target
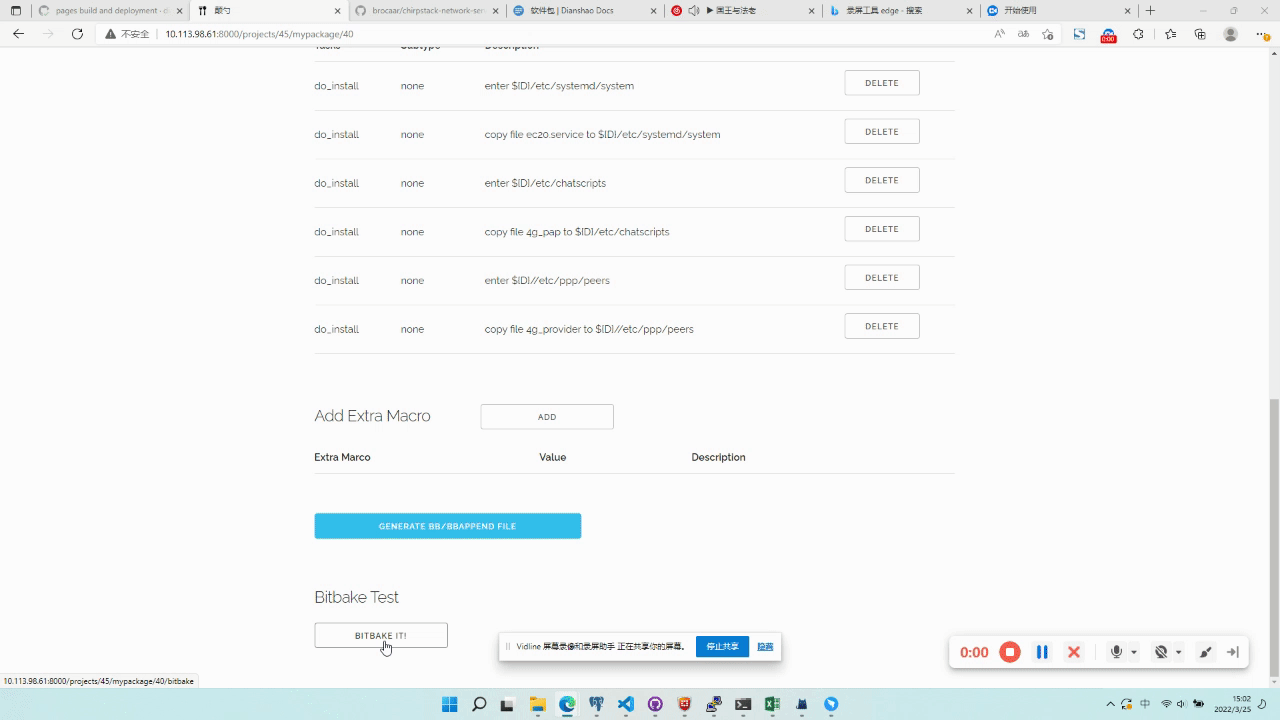
将上一步生成的三个文件安装到文件系统
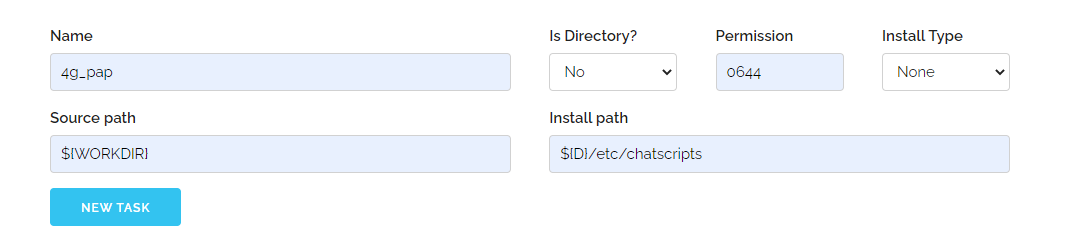
- 4g_pap: 安装到 /etc/chatscripts 目录下,如下图
- 4g_provider: 安装到 /etc/ppp/peers 目录下
- ec20.service: 安装到 /etc/systemd/system 目录下
点击 generate bbfile, 自动生成 bbfile,内容如下
# ec20-1.0.0
# Auto Generate by Dianshao
FILESEXTRAPATHS_prepend := "${THISDIR}/files:"
DESCRIPTION = "ec20 module package"
LICENSE = "CLOSED"
SRC_URI = "\
	file://4g_provider \
	file://4g_pap \
	file://ec20.service \
"
inherit systemd
SYSTEMD_AUTO_ENABLE = "enable"
SYSTEMD_SERVICE_${PN} = "ec20.service"
do_install () {
	install -d ${D}/etc/systemd/system
	install -m 0644 ${WORKDIR}/ec20.service ${D}/etc/systemd/system
	install -d ${D}/etc/chatscripts
	install -m 0644 ${WORKDIR}/4g_pap ${D}/etc/chatscripts
	install -d ${D}//etc/ppp/peers
	install -m 0644 ${WORKDIR}/4g_provider ${D}//etc/ppp/peers
}
点击 bitbake it, 测试生成的包是否能被正确编译
在 ec20 章节中我们详细介绍了如何新建一个 yocto 包,因此本章节及后续章节只介绍重要内容
创建时注意选择项目语言为 C/C++, 下载方式为 git
配置时有如下要点
- Extra Oemake: 填写 CC=’${CC}’,AR=’${AR}’, 使用 yocto 环境变量中的编译器,确保与整个项目保持一致
- src url: 从 github 拉取该项目,填写 git://git@github.com/Lora-net/lora_gateway.git;protocol=https;tag=v${PV}; 这是 yocto 要求的写法
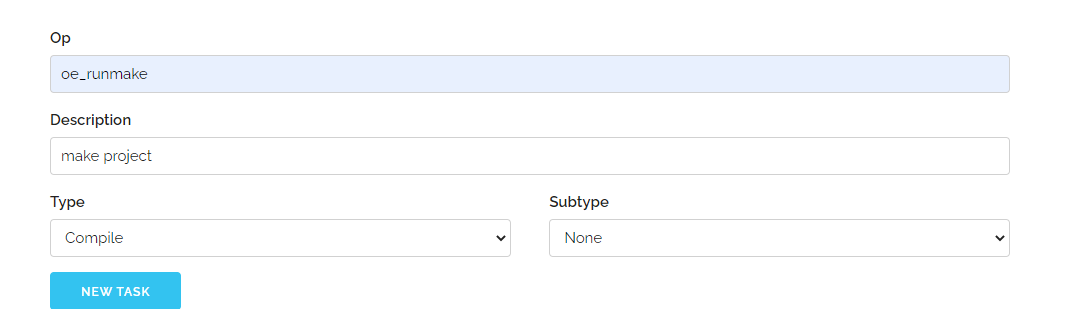
由于该项目为 hal 库,因此只需编译成 .a 文件供其他项目编译使用,无需安装到文件系统中。因此我们只需增加一条编译任务 oe_runmake
编译时无需优化参数,因此添加 INSANE_SKIP_${PN} += “ldflags”

按照 ec20 章节中操作即可
创建时注意选择项目语言为 C/C++, 下载方式为 git
配置时有如下要点
- Extra Oemake: 填写 CC=’${CC}’,AR=’${AR}’, 使用 yocto 环境变量中的编译器,确保与整个项目保持一致
- src url: 从 github 拉取该项目,填写 git://git@github.com/Lora-net/packet_forwarder.git;protocol=https;tag=v${PV}; 这是 yocto 要求的写法
- Depends: 依赖 lora-gateway, 需要其编译产生的 .a 文件
- 增加 packet-forwarder global_conf.json, 具体请见 semtech 说明
- 增加 packet-forwarder local_conf.json,具体请见 semtech 说明
- 增加 Makefile patch, 以使用 lora-gateway 产生的 .a 文件
--- ./Makefile
+++ ./Makefile
@@ -4,7 +4,7 @@

 ### Environment constants

-LGW_PATH ?= ../../lora_gateway/libloragw
+LGW_PATH ?= ../../../../lora-gateway/5.0.1-r0/git/libloragw
 ARCH ?=
 CROSS_COMPILE ?=
- 增加 systemd service 文件,packet-forwarder.service
- 增加 packet-forwarder 启动脚本,主要是要增加重启 lora 模组命令
-
编译任务: oe_runmake
-
创建文件夹 /usr/libexec/lora
-
安装 systemd 文件:安装 packet-forwarder.service 到 /etc/systemd/system
-
安装 lora_pkt_fwd 及配置文件到 /usr/libexec/lora
按照 ec20 章节中操作即可
该项目为 golang 项目,打算用本例说明如何创建一个 golang 项目包
创建时注意选择项目语言为 golang, 下载方式为 git
配置时 golang 相关选项如下
- goproxy: 使用 goproxy.io
- extra go env: 额外 golang 环境变量设置,通常不用填,除非需要配置私有仓库之类
- depends:golang 项目编译依赖 go-native
- inherit: golang 项目需要集成 goarch, 项目生成时已自动添加,用户检查下是否存在即可
- systemd service: 和前几章节一样,增加 systemd service 文件
- chirpstack-gateway-bridge 配置文件,请参考 chirpstack 官方文档
- 编译任务:由于该项目中使用 Makefile, 因此使用 oe_runmake 进行编译
- 安装可执行文件:将可执行文件 chirpstack-gateway-bridge 安装于 /usr/bin/chirpstack-gateway-bridge
- 安装配置文件:将配置文件 chirpstack-gateway-bridge.toml 安装于 /etc/chirpstack-gateway-bridge
- 安装 systemd service 文件:将 chirpstack-gateway-bridge.service 安装于 /etc/systemd/system
按照 ec20 章节中操作即可